
|
Courtesy of US Dept of Energy Is your water heater the right size for you house? | Photo credit ENERGY STAR® A properly sized water heater will meet your household's hot water needs while operating more efficiently. Therefore, before purchasing a water heater, make sure it's the correct size. Here you'll find information about how to size these systems:
For sizing combination water and space heating systems -- including some heat pump systems, and tankless coil and indirect water heaters -- consult a qualified contractor. If you haven't yet considered what type of water heater might be best for your home, learn more about selecting a new water heater. Sizing Tankless or Demand-Type Water HeatersTankless or demand-type water heaters are rated by the maximum temperature rise possible at a given flow rate. Therefore, to size a demand water heater, you need to determine the flow rate and the temperature rise you'll need for its application (whole house or a remote application, such as just a bathroom) in your home. First, list the number of hot water devices you expect to use at any one time. Then, add up their flow rates (gallons per minute). This is the desired flow rate you'll want for the demand water heater. For example, let's say you expect to simultaneously run a hot water faucet with a flow rate of 0.75 gallons (2.84 liters) per minute and a shower head with a flow rate of 2.5 gallons (9.46 liters) per minute. The flow rate through the demand water heater would need to be at least 3.25 gallons (12.3 liters) per minute. To reduce flow rates, install low-flow water fixtures. To determine temperature rise, subtract the incoming water temperature from the desired output temperature. Unless you know otherwise, assume that the incoming water temperature is 50ºF (10ºC). For most uses, you'll want your water heated to 120ºF (49ºC). In this example, you'd need a demand water heater that produces a temperature rise of 70ºF (39ºC) for most uses. For dishwashers without internal heaters and other such applications, you might want your water heated at 140ºF (60ºC). In that case, you'll need a temperature rise of 90ºF (50ºC). Most demand water heaters are rated for a variety of inlet temperatures. Typically, a 70ºF (39ºC) water temperature rise is possible at a flow rate of 5 gallons per minute through gas-fired demand water heaters and 2 gallons per minute through electric ones. Faster flow rates or cooler inlet temperatures can sometimes reduce the water temperature at the most distant faucet. Some types of tankless water heaters are thermostatically controlled; they can vary their output temperature according to the water flow rate and inlet temperature. Sizing a Solar Water Heating SystemSizing your solar water heating system basically involves determining the total collector area and the storage volume you'll need to meet 90%–100% of your household's hot water needs during the summer. Solar system contractors use worksheets and computer programs to help determine system requirements and collector sizing. Collector AreaContractors usually follow a guideline of around 20 square feet (2 square meters) of collector area for each of the first two family members. For every additional person, add 8 square feet (0.7 square meters) if you live in the U.S. Sun Belt area or 12–14 square feet if you live in the northern United States. Storage VolumeA small (50- to 60-gallon) storage tank is usually sufficient for one to two three people. A medium (80-gallon) storage tank works well for three to four people. A large tank is appropriate for four to six people. For active systems, the size of the solar storage tank increases with the size of the collector -- typically 1.5 gallons per square foot of collector. This helps prevent the system from overheating when the demand for hot water is low. In very warm, sunny climates, some experts suggest that the ratio should be increased to as much as 2 gallons of storage to 1 square foot of collector area. Other CalculationsAdditional calculations involved in sizing your solar water heating system include evaluating your building site's solar resource and determining the proper orientation and tilt of the solar collector. Visit the solar water heaterspage for more on these calculations. Sizing Storage and Heat Pump (with Tank) Water HeatersTo properly size a storage water heater for your home -- including a heat pump water heater with a tank -- use the water heater's first hour rating. The first hour rating is the number of gallons of hot water the heater can supply per hour (starting with a tank full of hot water). It depends on the tank capacity, source of heat (burner or element), and the size of the burner or element. The EnergyGuide label lists the first hour rating in the top left corner as "Capacity (first hour rating)." The Federal Trade Commission requires an EnergyGuide label on all new conventional storage water heaters but not on heat pump water heaters. Product literature from a manufacturer may also provide the first hour rating. Look for water heater models with a first hour rating that matches within 1 or 2 gallons of your peak hour demand -- the daily peak 1-hour hot water demand for your home. To estimate your peak hour demand:
The worksheet example shows a total peak hour demand of 36 gallons. Therefore, this household would need a water heater model with a first hour rating of 34 to 38 gallons. Worksheet for Estimating Peak Hour Demand/First Hour Rating *
EXAMPLE Adapted from information from the Federal Energy Management Program Energy Cost Calculator.
0 Comments
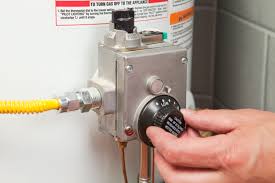 Water heater manufactures recommend setting your water heater temperature at 120 degrees to help prevent scalding and to save energy. Scalding is a real concern if you have small children or elderly in your home. If your hot water has an unpleasant odor, it is usually caused by some bacteria. Raising the temperature above 140 degrees may help, but bear in mind, the risk of scalding due increases dramatically once the water temperature is above 130 degrees! Basically you'll need to adjust the temperature to suit your needs, or your budget. How To Check Your Hot Water Heater Temperature Allow your water heater to sit for one hour, unused before checking the temperature. Most water heater manufacturers will label the water heater with an FHR - First Hour Rating; this is how much water is heated to the temperature setting in one hour. You can use a baking thermometer to check your water heater temperature. Go to the faucet nearest the water heater. Run the hot water for one full minute ( this will heat the plumbing supply lines, and give you a more accurate reading ). Fill a coffee cup from the faucet and read the thermometer. About water heater settings: Because heat rises (yes, even in water) the water in the top of a water heater can be much hotter than the water in the bottom. This is especially true of a gas water heater where the thermostat and burner are located at the bottom of the tank. Water heater settings or temperature settings are not exact temperatures. The degree settings on a thermostat are approximate. This is especially true with gas water heater thermostats, and the temperature setting is sometimes based on whatever the person installing the water heater felt like it should mean! In other words, HOT could be 120, 130, 140 degrees, etc. Gas water heater Adjustment Gas water heaters use a simple knob on the front, bottom of the tank for temperature settings. Remember, the words or numbers on the front of the knob don't necessarily represent a set temperature. It is crucial that you closely check, and adjust the settings slowly. Test, then adjust. Repeat as necessary. Electric Water Heater Adjustment Adjusting an electric water heater temperature setting is not as simple. The water heater will generally have 1 or 2 heating elements. These will be covered by a plastic or metal panel cover on the front of the water heater tank. You will need to adjust each element to the same setting. Before you do anything, remember to shut off power to the water heater, preferably via the electrical breaker in the electrical panel. I generally recommend starting with the lower element, and then move to the top element. The cover will need to be removed, where you'll usually find some fiberglass insualtion you can reomve (with gloves). Then you'll find a simple plastic cover you can lilft or remove to find the thermostat. The thermostat will need to be adjusted with a flat head screw driver. Remember, adjsut slowly and carefully! Test as you go to find the ideal temperatuer for your home. Replace the plastic cover(if you removed it). Place the insulation back over the thermostat and element. Replace the access panels and turn the power back on. 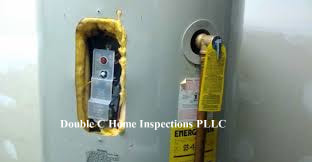 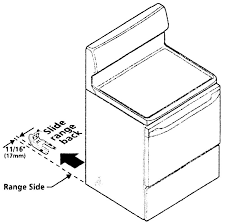 One of the more common defects I come across during home inspections is missing anti-tip devices on free standing ranges. Though a property inspection can reveal many defects that require a repair from a licensed professional, such as electrical defects, this particular defect can be corrected by just about anybody handy enough to give it a go. The truly sad part of this issue is that just about every new range sold should already include an anti-tip device with the range when sold, per the manufacturer. It seems, they're just not installed...
Why these are not properly installed is another one of the many head-scratchers I see as a licensed real estate inspector in west Texas. At any rate, if you find that your free standing range is missing an anti-tip device, it's time to correct that defect. ASAP! Here is an article from several years back providing additional details. From the N.Y. Times: Is There a Killer Stove in Your Kitchen?BY THE EDITORIAL BOARD MARCH 6, 2008 3:44 PMMarch 6, 2008 3:44 pmFor about a year now, consumer groups have been waging a war against killer stoves. It sounds like a bad horror movie, but it’s for real. Consumer advocates estimate that there have been at least 33 deaths and 84 serious injuries in recent years from stoves that suddenly tip over and burn or kill someone underneath. Most of the victims have been children scalded by whatever is bubbling on top of the stove, or elderly people trying to get something in or out of the oven. The stove grandma used probably couldn’t be moved or tilted without using a small forklift. Newer stoves, however, are different. Many are so light that when their door is opened and weight is applied — by, for example, resting a pot on that open door for a moment — the entire appliance turns into a see-saw, spilling hot food and liquids on cooks and onlookers. Worse, some stoves have been known to tilt and then fall over completely. The solution is simple. An anti-tip bracket should be installed with every stove to keep it steady and upright while in use. In a recent settlement of a class-action lawsuit, Sears agreed to install the necessary brackets on about four million free-standing or slide-in stoves that were sold, delivered, and connected by the store between July 2, 2000 and September 18, 2007. The company also agreed to install anti-tip brackets on all free-standing stoves delivered over the next three years. The settlement is good news for Sears customers, but what about people who buy their stoves somewhere else? So far, the Consumer Product Safety Commission hasn’t done a thing for them. Joan Claybrook, president of Public Citizen last month petitioned Nancy Nord, the acting chair of the commission, to begin recall proceedings against stoves sold by retailers other than Sears. Discussions are still underway. Unfortunately, in recent years, the commission has been know for its close ties to industry, and its reluctance to stand up for consumer safety. Ms. Nord has been criticized for traveling on industry’s dime — and then failing to rein in industry. This is not the first time the commission has been asked to fix these stoves. The first accidents started happening almost twenty years ago. After the Sears settlement, the commission did act on stoves — sort of, as Ed Mierzwinski of U.S. PIRG points out. The commission announced a voluntary recall of a toy stove after a child reported being bruised when it tipped over. Toy stoves bruising children are bad, certainly, and should be stopped. But what about real stoves scalding and killing people? If you'd like to learn more, have questions, or would like to discuss property inspection, call me! I can help! (806)544-8540 or (432)202-7544 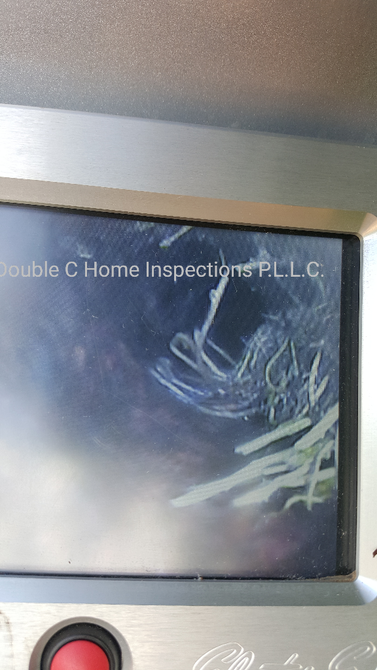 One of the most common questions I hear from buyers and agents alike is related to inspection of sewer drain lines under the home and on the property. As a home inspector in Texas, this information exceeds that Texas SOP for home inspections, and is generally the purview of a plumbing service company.
The most effective way to provide this information is by using a camera attached to a cable to view the interior of the sewer line for defects. This process is generally referred to as using a sewer scope. The photo above is a great example of the value of such a service. The photo shows a clear indication that the sewer line below this home(mine!) has been damaged and is compromised by tree roots. The sewer lines below my home are comprised of cast iron, which is known for rusting and degrading over decades. Of course, my home is over 55 year old, so it is no surprise that these lines are beginning to fail. This has presented the good ol’ fruitless mulberry tree in my front yard with a veritable endless supply of nutrient (yuck!) rich moisture to pilfer at will. And that’s just what the tree roots have done. By entering the small crack in the wall of the sewer line, they have accessed the drain line and will only continue to damage the sewer line over time. The bad news: there is no repairing this type of damage. The modifications necessary would include replacement of the damaged area of the sewer line (though replacement of the entire sewer line is a better long term solution) or having the sewer line lined with a special product that in effect creates a new sewer line from the inside out. Each of these processes are offered by many local plumbing companies. Costs range from about $5000 on up for a home like mine. Needless to say, this is not cheap, or fun. Plan to be without sewer access for a day or more, at least. However, when buying a used home, or sometimes even a brand new home, hidden problems are everywhere. As an informed home owner, you can plan ahead and be as prepared as possible for the unexpected. I can offer you some helpful advice if you are facing this problem with your own home. It might even save you some $$$. Call me for more details and we can discuss further!! (806)544-8540 or (432)202-7544 #realestate #doublec #lubbock #midland #odessa #property #inspection #inspector 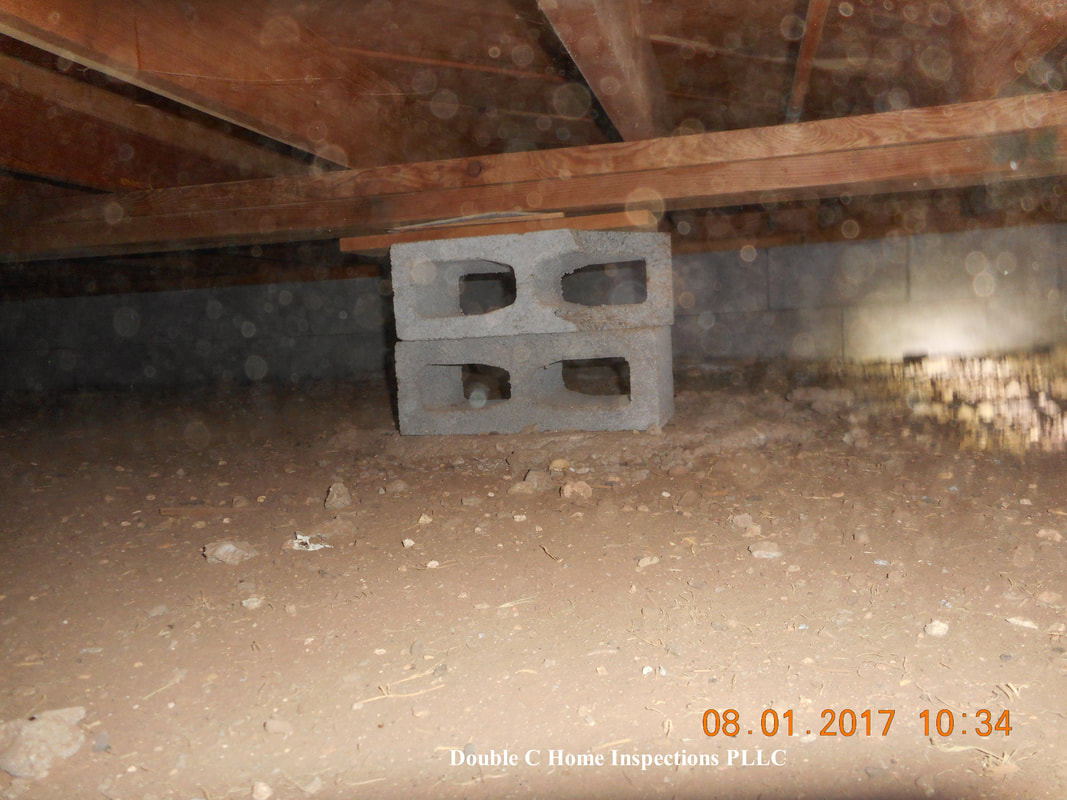 Foundation failures are some of the most common worries for the average home buyer, and understandably so. Foundation failures can result in costly repairs, and can sometimes cause additional damage if the repairs are not completed properly.
First: the overwhelming majority of homes I've inspected have not had evidence of foundation defects. This means that homes with foundation problems of any kind are in the minority, to be sure. How can you tell if your home has foundation concerns? First, the evidence will usually present itself in other locations, and in other ways. One of the ways I look for foundation defects is to observe cracks on the exterior. Cracks on the exterior do not mean you have foundation failures. However, cracks on the exterior, along with similar damage on the interior near the same location can mean we may have a foundation problem. The photo above was taken at a home with obvious settlement cracks on the exterior and near the same location on the interior. This home was built with a pier and beam foundation, so it therefore had a crawl space. Unfortunately, many crawl spaces are inaccessible. However, this one was accessible, and it didn't take long to establish why there were so many cracks on the exterior and interior. The ironic thing with this home was that the homeowner claimed to have already paid a foundation repair company to fix his foundation. I don't know whether that was true or not, as that's not a part of my job. But If that were true, the foundation repair company certainly let him down. Some contractors place themselves in an adversarial position when it comes to home inspectors. Again, if this homeowner is telling the truth, this is a great example of why a professional home inspector is so important! I do not gain or lose because this home has foundation problems. Yet, a foundation contractor has already made $$ off of this home, and some other foundation contractor likely will again. This underscores the importance of having an unbiased expert to take a look at your property before it's too late! I don't pass or fail homes: the home tells it's own story, I just record it! #doublec #hireapro #protectyourinvestment #trustyourinstincts #realestate 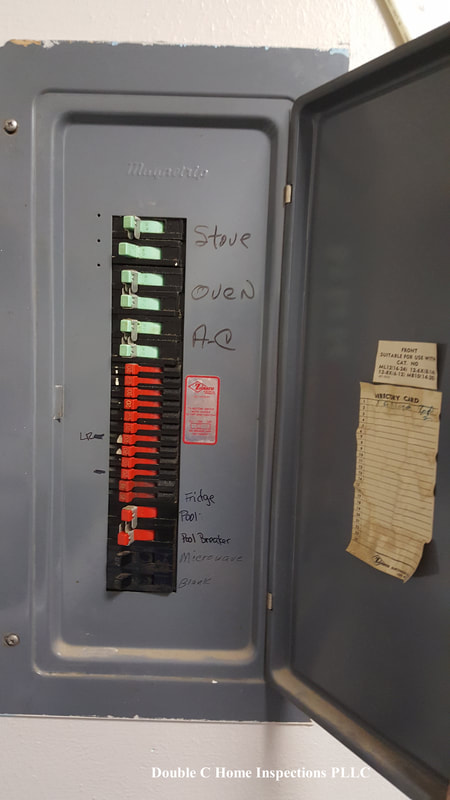 The photo above is a Zinsco/Sylvania brand electrical panel. This panel is not especially common in West Texas, but I have seen around a dozen so far in my inspection travels. If you're home was built in before 1980, there is a possibility that this panel is installed in your home.
The Zinsco/Sylvania brand electrical panel has a documented history of failure since it's inception. As the decades have passed, savvy electricians and home inspectors have observed and documented that some Zinsco panels can fail to operate as intended and may leave homes and homeowners at risk to both fire and electrical hazards. These panels can work fine for many years, but as homes have increased energy demands (because of more and more electronic devices in the home), these panels may overheat and portions of it melt. In a situation like this, if a breaker melts to the bus bar of the panel and can no longer adequately trip in case of an overcurrent or short circuit, an extreme amount of power from the outside electrical supply surges into a home’s panel and circuits. Once this scenario plays out, it cannot be stopped or shut off manually. Electricity will burn until it runs out of fuel or the wires melt. The panel could overheat and catch fire, causing serious harm to a home and its occupants. Many of the documented failures with this brand of panel and breaker relate to just such a scenario: the breaker melts to the bus bar, and then the only way to shut off power to prevent catastrophic electrical failure is to shut off power to the home itself, which is sometimes not an easy task. In fact, there are several highly respected home inspectors nationwide who refuse to even inspect this brand of electrical panel - they will simply recommend replacement. What can you do if your home has this brand of electrical panel installed? Contact a licensed electrician to replace it with a modern panel and breaker system that is safe. I would not advise taking chances with this brand of panel; just because it has lasted this long does not mean it can't fail today and endanger you or your family! If you'd like to learn more, feel free to contact me! (806)544-8540 (432)202-7544 #realestate #hireapro #protectyourinvestment #trustyourinstincts #doublec August 24, 2017 – Home sales were down again in July 2017 according to the Lubbock Area Housing Market Report. According to the report, 376 homes were sold in July 2017, 14% less than July 2016. Home prices continued their upward trend, however, up 4% compared to July 2016, with the median price for Lubbock area homes being $156,750.
The number of active listings on the market increased almost 7% compared to July 2016, with 953 homes actively listed. Like the majority of Texas, Lubbock remains a strong seller's market in most price ranges. Buyer's should be prepared to make full-price offers, with little to no concessions. Months inventory is the best indicator of a buyer's or seller's market, and this figure increased slightly, from 2.8 months in July 2016 to 3 months in July 2017. The Real Estate Center at Texas A&M University cites that 6.5 months of inventory represents a market in which supply and demand for homes is balanced. Months invetory is defined as the number of active listings divided by the average sales per month of the prior 12 months. Lubbock's home invetory has not been more than 3 months since November 2014. Homes spent an average of 65 days on the market in July 2017, five days less than July of last year. July 2017 Statistics At-A-Glance
Hello!
I am a Texas licensed professional home inspector. I inspect properties, big and small, all over West Texas. Texas has the most stringent standards for property inspectors in the U.S.. From training and education, to thorough background checks, we have been through it all to become licensed real estate inspectors. I take great pride in that! I wanted to take a moment to share with you what you can expect during the home inspection at your property: First, let me say that I will treat your home with the utmost respect, just as I would any other property. I am a guest, and will conduct myself as such. It’s important that I can access all areas of the property, inside and out. Some common areas that are difficult to access during inspections are attic access locations, crawlspace access locations, electrical panels, HVAC systems, the garage, storage closets, and the water heater. This list is not all encompassing, of course. As a general rule, the state of Texas does not require property inspectors to move personal belongings to access anything. I would not want to risk damage to your property, so I ask that you do all you can as the homeowner or occupant to make all areas “readily accessible.” Pets are a non-issue for me personally. However, if your pet could become nervous or anxious with my presence and activity, It might be best for you and I if your pet is placed in a safe location that won’t prevent my access to the entire home for inspection. I’m often asked if it’s ok if you, the seller or occupant, are present for the inspection. The answer is it’s your property, not mine. I’m your guest. I will take lots of pictures throughout my inspection. Some are of defects, and trust me your home has defects. I have never inspected a property that was defect free. New, old, it makes no difference. No property is perfect. Some pics I take are merely for my information, and may never make it into the inspection report. Don’t worry, I take all parties privacy very seriously, and would never dream of risking that trust. I will strive to place everything back just like I found it when I leave. I appreciate you accommodating me! Cale Cameron TREC License #21098 Double C Home Inspections PLLC Hundreds of times every year, I see homes with brick veneer or stone veneer. Many of the homes in your own neighborhood are constructed this way, too. There's a common misconception that the brick or stone on these walls is in fact, "the wall'. In fact, a recent local news story on an accident that damaged a home called the destoyed wall "a brick wall". The truth of the matter is the brick or stone on almost all homes in our area is simply a facade, a veneer. It is not structural, though it could present evidence of structural defects. But maybe I better stick to the purpose of this blog entry, huh? Virtually every home older than 5 years that I've inspected with brick or stone veneer has some sort of mortar joint &/or brick damage on the exterior. Most of the damaged areas 'appear' to be insignificant. Spoiler alert! They're not, and I can prove it! I was recently hired to consult with a property owner on a recurring problem they were having. When I consult with a property owner regarding an issue like this one, they usually have an idea that they have a problem already, and just want my help to recommend a fix. 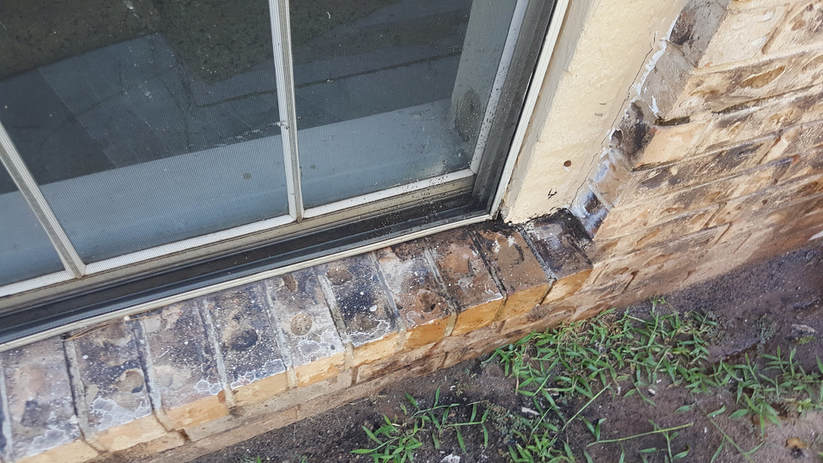 Above is a photo of a window enclosed on the exterior with wood trim and brick veneer. Looks like any other window in West Texas, right? No visible defects, right?..... 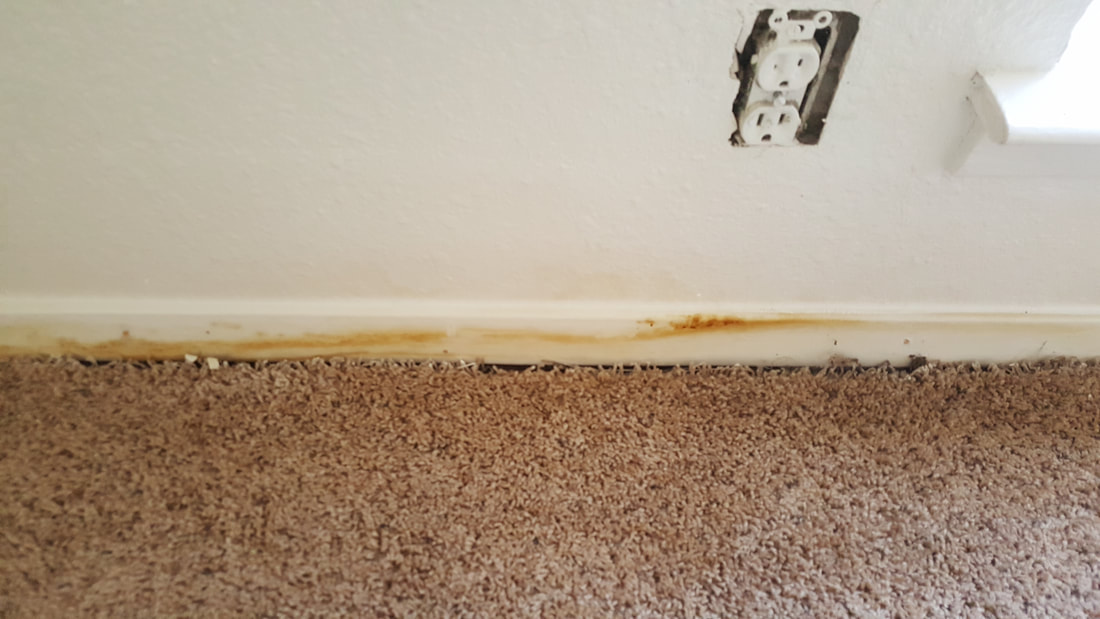 Here, we have the inside wall behind said window. Obvious to at least some folks, there is staining on the baseboard. Cause? Could be a variety of possibilities. Spills on the interior? Pet urine? Leak from the roof? The next question a professional inspector will ask is, "Is it still wet?" Or, at least, is the moisture level in the drywall above the baseboard, or in the baseboard elevated when compared to the rest of the property? 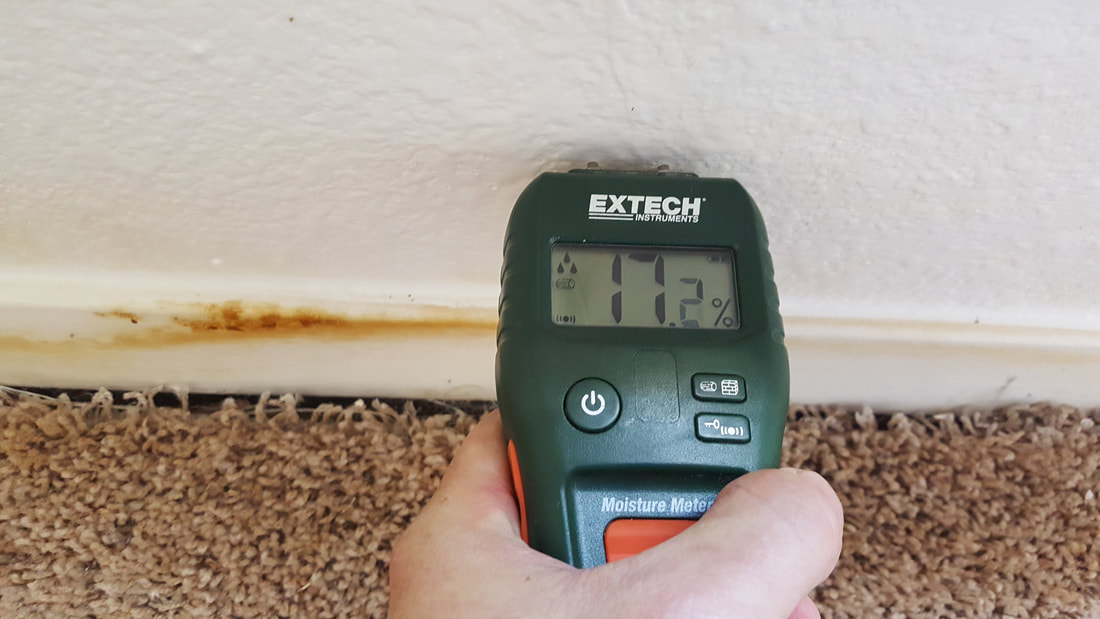 No fancy tools necessary when you know what to look for. And I do! Here we have a simple, highly accurate moisture meter, and as you can see, the moisture level in the drywall above the stain reads over 17%. Is that high? Well, compared to the rest of the living area, this reading is nearly 10% higher than other walls with no staining. So, yes, it's elevated. But why?  With the approval of the property owner, we were able to remove the drywall I just tested for elevated moisture levels, along with the insulation in the wall. I then had the property owner use a garden hose to spray the exterior window near the mortar joints to see what happened, as I had my suspicions. You can see water trickling in near the corner of the window/brick veneer junction. A clear sign that the cause of the moisture staining in this room near the window is due, at least in a large part, to the deteriorated mortar joints on the exterior. This property owner recently purchased the property, and is unfortunately looking at major repairs due to moisture damage and possibly termite damage. This could possibly have been avoided if the property had been well maintained, especially the exterior. 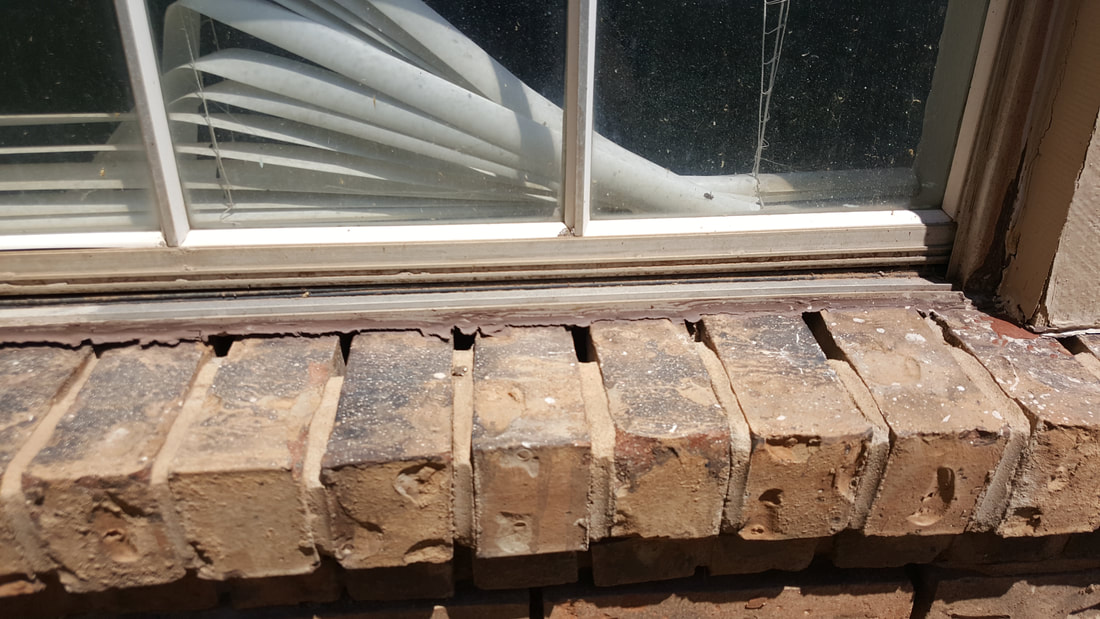 The last photo is of the worst case scenario; different window obviously, with major deterioration at the mortar joints. I'm sure you can probably guess that the moisture intrusion damage in the interior near this window was much more severe!
In conclusion, this is a great reminder that moisture will find it's way into your home if you allow it. It's up to each of us to make sure our homes are well maintained! If you'd like more information, or to schedule a consultation, please feel free to contact me at (806)544-8540 or (432)202-7544 #realestate #inspection #lubbock #midland #odessa #professional #consulting #moisture #themoreyouknow When buying a home in a competitive market as we are currently experiencing here in West Texas, it’s tempting to make some risky decisions to make your offer seem like the best one. This could mean offering more than the asking price or a agreeing to a quick closing which aren't so bad. Insome cases, waiving the much needed inspections. This is a VERY BAD IDEA! Although waiving inspections might seem like a good idea when your offer keeps getting beat out, it’s not. Here's why:
While the house may look good to the eye, there are many problems the average buyer can’t detect that can cost you a lot of money down the line. More than once, I've had sellers and BUYERS tell me that they don't expect I'll find much in the way of defects during their home inspection. 100% of the time, those sellers and BUYERS are wrong! For example, beyond the surface there may be problems like termites, malfunctioning systems, or improperly installed electrical that is potentially hazardous! No matter how much you want the house, do not make an offer without having it thoroughly inspected. Here are some solutions to satisfy your need to inspect while remaining timely and competitive. Pre listing or pre sale Inspection If you really love this house, have it inspected before you make an offer or sign a contract. Although you might end up spending a few hundred dollars on a house you don’t end up purchasing, it’s better to be safe than sorry. If the house ends up passing inspection, now you can waive your inspection contingency. A seller will often have his or her property inspected before putting it up for sale, called a pre listing inspection. This way the seller can fix any issues before listing, or tell buyers upfront what they are getting. This protects the seller from future negotiations as well as allows proper pricing of the home. The only issue with this is that the inspector is liable to the seller only, the person who ordered and paid for the inspection. Quick Inspection Contingency Sellers like to keep the process moving, so there is usually a small window of time between when offers are due and a deal starts to move forward. When you need to get your offer in quickly and there’s no time to inspect, write a one- or two-day inspection contingency into your offer. This gives the seller comfort knowing the sale won’t lose momentum, and you’ll have peace of mind, too. If you are working with a good local agent, he or she should probably already works with me! I can usually fit in urgent inspections to help you meet your deadlines! If you feel yourself getting caught up in the bidding war, keep in mind the bigger picture. You are purchasing a large asset, and you do not want to find yourself in debt due to a pricey problem you missed by waiving the inspection. To schedule a home inspection today, call me! (806)544-8540 or (432)202-7544 #realestate #inspection #texas #realtor 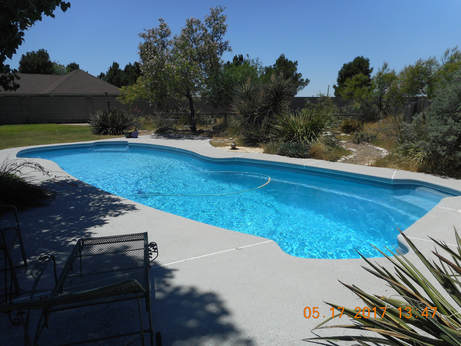 I inspect pools on a regular basis as part of a home inspection. Here are some great points to keep in mind regarding owning or installing a swimming pool. If you're planning to install a pool, be prepared to spend a pretty penny. On average, in-ground pool installations average $40,000. A word to the wise: Don't expect to add the pool value to your asking price when you sell your home someday. The truth is, many buyers may consider a home with a pool more of a burden than a blessing. If you decide to begin with a pool installation, carefully consider pool placement in your yard. Consider daylight and how it will impact water temps, view from the home from a safety standpoint, etc. An experienced pool installer should be able to help you avoid making a mistake with pool placement. I also recommend getting to know safety guidelines and requirements for pool installation. The short version amounts to you being responsible for whatever happens, so bear that in mind when planning your pool. Safety should be your #1 priority in considering buying or installing a swimming pool. Of course, before you buy a home with a pool, get the pool inspected. Please remember that the pool should be operating as if it will be used for swimming at any time in order for a proper inspection to take place. Many times, some or all equipment has been shut down by the homeowner to save money or hide defective equipment. I do not turn on equipment or operate valves/components of the pool due to liability. Most experienced pool inspectors nationwide stick to these guidelines as well. It may help to find out if the previous homeowner had a pool company servicing the pool so you can find out if it's been serviced regularly and what that company charges. Keep in mind that maintenance is never cheap, and can become a burden if you are attempting to DIY. Many pool maintenance companies charge a few hundred dollars for the company to open the pool at the beginning of the summer (including removing the cover, cleaning out debris and getting the motor running again), and close it at the end of the season, while others also charge for weekly or biweekly cleanings. When homeowners don't pay for regular cleanings or clean it themselves, that can trigger costlier maintenance calls. The cost of replacing motors, heaters, pumps and covers (which can get moldy if they're rolled up while wet) varies depending on the size and model used. Adding chemicals to balance the pool's pH level is another cost. Pools that are unused or partially filled in the heat of the summer are always a red flag. If the home you're considering has a pool that is not operating or partially filled, assume the wor$t! Don’t forget about insurance costs. Insurance companies usually try to avoid insuring homes with swimming pools. Contact your insurance company or agent to make sure you can get coverage, and find out what it will cost you, since a pool increases the homeowner's liability risk. Pools are meant to be fun, so getting a handle on the expected costs can help avoid costly surprises in the future. If you're planning to purchase a home with an in ground swimming pool, feel free to contact me! I can take care of your home inspection and pool inspection. #pool #swimming #realestate #lubbock #odessa #midland #texas #inspector #realtor AFCI’s and our future.
You may or may not be familiar with the term AFCI. An Arc Fault Circuit Interrupter (AFCI) is a circuit breaker that breaks the circuit when it detects an electric arc in the circuit it protects to prevent electrical fires. An AFCI selectively distinguishes between a harmless arc (incidental to normal operation of switches, plugs, and brushed motors), and a potentially dangerous arc (that can occur, for example, in a lamp cord which has a broken conductor). Arc faults are one of the leading causes for residential electrical fires. Each year in the United States, over 40,000 fires are attributed to home electrical wiring. These fires result in over 350 deaths and over 1,400 injuries each year. Conventional circuit breakers only respond to overloads and short circuits, so they do not protect against arcing conditions that produce erratic, and often reduced current. An AFCI is selective so that normal arcs do not cause it to trip. The AFCI circuitry continuously monitors the current and discriminates between normal and unwanted arcing conditions. Once detected, the AFCI opens its internal contacts, thus de-energizing the circuit and reducing the potential for a fire to occur. AFCIs are not new. In fact, they've been required by the National Electric Code (NEC) since 1999. You may have never heard of AFCIs because your home was built prior to their widespread use. As of the 2014 NEC, AFCI protection is required on all branch circuits supplying outlets or devices installed in dwelling unit kitchens, family rooms, dining rooms, living rooms, parlors, libraries, dens, bedrooms, sunrooms, recreation rooms, closets, hallways, laundry areas, and similar rooms and areas. My prediction, is that AFCIs will be required for every circuit at every home in America, probably very soon. Safety and Security have come a long way in the last decade or so. Electrical systems can provide a tremendous amount of power and convenience to a home, with little to no concern or responsibility on the part of the homeowner. It's important for your home to have a certain level of safeguards installed in your electrical system, which could include AFCIs or other safety devices. As a reminder, your responsibility as a home owner or occupant is to test your AFCI breakers (if installed) at least monthly. How do you know if you're home has this safety device installed? The only way to know for sure, is to hire a licensed professional home inspector to check before you buy. If you'd like to learn more about AFCIs and other components of your home, please check back on my blog, as I plan to update often with great content! Thank you for stopping by!  Drain/Waste vent systems (DWV) systems maintain air pressure in the drain lines, allowing flow of water and sewage down drain lines and through waste pipes using good ol’ gravity. It’s important that a downward slope be maintained throughout, to keep liquids and solids flowing freely towards the main drain from the building. In rare situations, a downward slope out of a building to the sewer can’t be created, and a special collection pit and grinding lift "sewage ejector" pump is needed. By contrast, drinking water supply systems operate under pressure to distribute water up through buildings, and do not require a continuous downward slope in their piping.
Every fixture is required to have an internal or external trap; double trapping is prohibited by current plumbing codes due to its susceptibility to clogging. Every plumbing fixture must also have an attached vent. The top of stacks must be vented too, via a stack vent, which is sometimes called a stink pipe. All plumbing waste fixtures use traps to prevent sewer gases from leaking into the house. Through traps, all fixtures are connected to waste lines, which in turn take the waste to a "soil stack", or "soil vent pipe". At the building drain system's lowest point, the drain-waste vent is attached, and rises (usually inside a wall) to and out of the roof. Waste exits from the building through the building's main drain and flows through a sewage line, which leads to a septic system or a public sewer. Cesspools are generally prohibited in developed areas. The venting system, or plumbing vents, consists of a number of pipes leading from waste pipes to the outdoors, usually through the roof. Vents provide a means to release sewer gases outside instead of inside the house. Vents also admit oxygen to the waste system to allow aerobic sewage digestion, and to discourage noxious anaerobic expansion. Vents provide a way to equalize the pressure on both sides of a trap, thereby allowing the trap to hold the water which is needed to maintain effectiveness of the trap, and avoiding "trap suckout" which otherwise might occur. A sewer pipe is normally at neutral air pressure compared to the surrounding area. When a column of waste water flows through a pipe, it compresses air ahead of it in the pipe, creating a positive pressure that must be released so it does not push back on the waste stream and downstream trap water seals. As the column of water passes, air must freely flow in behind the waste stream, or negative pressure results. The extent of these pressure fluctuations is determined by the fluid volume of the waste discharge.Excessive negative air pressure, behind a "slug" of water that is draining, can siphon water from traps at plumbing fixtures. Generally, a toilet outlet has the shortest trap seal, making it most vulnerable to being emptied by induced siphonage. An empty trap can allow noxious sewer gases to enter a building.On the other hand, if the air pressure within the drain becomes suddenly higher than ambient, this positive transient could cause waste water to be pushed into the fixture, breaking the trap seal, with serious hygeine and health consequences if too forceful. Taller buildings of three or more stories are particularly susceptible to this problem. Vent stacks are installed in parallel to waste stacks to allow proper venting in tall buildings.Most residential building drainage systems in North America are vented directly through the building roofs. The DWV pipe is typically ABS or PVC DWV-rated plastic pipe equipped with a flashing at the roof penetration to prevent rainwater from entering the buildings. Older homes may use Cast iron or lead pipes.Under many older building codes, a vent stack (a pipe leading to the main roof vent) is required to be within a 5-foot (1.5 m) radius of the draining fixture it serves (sink, toilet, shower stall, etc.). To allow only one vent stack, and thus one roof penetration as permitted by local building code, sub-vents may be tied together inside the building and exit via a common vent stack. One additional requirement for a vent stack connection occurs when there are very long horizontal drain runs with very little slope to the run. Adding a vent connection within the run will aid flow, and when used with a cleanout allows for better serviceability of the long run.A blocked vent is a relatively common problem caused by anything from leaves, to dead animals, to ice dams in very cold weather, or a horizontal section of the venting system, sloped the wrong way and filled with water from rain or condensation. Symptoms range from bubbles in the toilet bowl when it is flushed, to slow drainage, and all the way to siphoned (empty) traps which allow sewer gases to enter the building.When a fixture trap is venting properly, a "sucking" sound can often be heard as the fixture vigorously empties out during normal operation. This phenomenon is harmless, and is different from "trap suckout" induced by pressure variations caused by wastewater movement elsewhere in the system, which is not supposed to allow interactions from one fixture to another. Toilets are a special case, since they are usually designed to self-siphon to ensure complete evacuation of their contents; they are then automatically refilled by a special valve mechanism.An island fixture vent, sometimes colloquially called a "Chicago Loop" is an alternate way of venting the trap installed on an under counter island sink or other similar applications where a conventional vertical vent stack or air admittance valve (AAV) is not feasible or allowed.As with all drains, ventilation must be provided to allow the flowing waste water to displace the sewer gas in the drain, and then to allow air (or some other fluid) to fill the vacuum which would otherwise form as the water flows down the pipe.An island fixture vent provides an elegant solution for this necessity: when the drain is opened, water displaces the sewer gas up to the sanitary tee, the water flows downward while sewer gas is displaced upward and toward the vent. The vent can also provide air to fill any vacuum created.The key to a functional island fixture vent is that the top elbow must be at least as high as the "flood level" (the peak possible drain water level in the sink). This ensures that the vent never becomes waterlogged. Like to learn more about your home and how it all works? Check back here often for great content. Too often, I see DIY installation and repairs throughout the home inspection process that are wrong, and just plain unsafe! When it comes to doing electrical repairs and dealing with electrical problems, trying to sort them out yourself is one of the most dangerous and ultimately costly approaches that you can take. Too many people underestimate the complexity of the services carried out by a licensed electrician and think that they will be able to address the problem without the need for professional electrical contractor.
When working with electricity, safety should be priority one! While it is true that there are some electrical jobs that a number of people can successfully complete, all too often the average person is unaware of the safety measures and precautions that are taken by trained and reputable electricians. There really is no substitute for having a job done thoroughly and safely by hiring a professional licensed electrician to complete your repairs. I can't stress enough, call a pro when it comes to electricity! It could save your life! That being said, what are some of the most common electrical mistakes made by people who know little about working with electricity? Below is a great sample of what I see daily! #1: Using incorrectly sized wires and cables The term ‘gauge’ refers to the variety of sizes that electrical wire comes in. Different sized wires are used for different jobs and purposes and the gauge of the wire also dictates the areas in which it should be used. If the wrong sized wire is used for the electrical current, overheating or a shorting of the fuse or circuit breaker can result. Therefore, it is very important that the wire and devices that are appropriately rated for the amperage they will carry are used. #2: Incorrect repairs of outlets and switches We can all picture outlets and switches that seem to dangle from the wall. Perhaps you even have some of these around your home or office. Outlets and switches in such a state are categorically dangerous. When appliances are plugged in to loosely fitted outlets, the wires can loosen from their terminals and cause arcing and overheating. #3: Poor connections in electrical boxes or missing junction boxes Never attempt to make electrical connections outside of electrical junction boxes. The purpose of electrical boxes is to provide protection from external elements; if you wish for an extension, a metal or plastic box should be used. It is also hazardous to add to or overfill electrical boxes with connections as this increases the likelihood of short-circuiting and overheating. #4: Replacement of breakers/fuses Protection of wire ampacity ratings, together with the electrical flow onto all connected appliances, is afforded by the safety mechanisms of breakers and fuses. It is often the case that when a fuse keeps blowing a person believes that it just needs to be replaced – over and over again – or that a bigger fuse or breaker needs to be used. Frighteningly, this is one of the major causes of home fires and continually replacing fuses or resetting breakers is dangerous. If a fuse continually blows, or the breaker trips, there is a problem with the circuit wiring and this needs to be attended to by a professional and qualified electrician. #5: Loose connections It is important that all connections in a breaker/fuse box are tight and correctly placed. If connections are loose, appliances and lights will often flicker and perhaps even shut off. In the worst case, circuits will overheat, potentially creating a fire hazard! If you suspect that you have a problem with your electrical connections, arrange to have them inspected by an electrician. While it is definitely not recommended that you try to inspect them yourself, be aware that it is essential that breakers are turned off before they are examined. #6: Overloading outlets and electrical cords Overloading switches or outlets is one of the most frequently seen electrical mistakes. It may not seem a problem as multiple adaptors and switches with many outlets can easily be purchased, but if a circuit is loaded up with more amps than it can handle, the breaker is at greater risk of tripping. This risk is especially great when switches and outlets are loaded up with big appliances such as air conditioners, refrigerators and dishwashers. When it comes to the use of electrical cords, electricians recommend that an electrical cord only be used if it has the required ampacity. Please remember, extension cords are not designed for use as permanent electrical supply! The common electrical mistakes covered in this article are ones that many of us relate to; in fact, many are present in the average home or workplace. It is important to be mindful of these problems and always seek the services of an electrician to fix electrical problems. Have a question regarding your electrical system? Call me! I can help! If you have a Carrier or Bryant brand Heat Pump, check out the following recall info:
https://www.wthr.com/article/carrier-and-bryant-recall-heat-pumps-due-to-fire-hazard New construction home? Get it inspected! Any questions? |
AuthorCale Cameron Archives
March 2024
Categories |
 RSS Feed