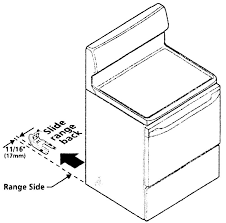
 Without question, this inspector and likely every other inspector in Texas has one defect they identify more than all others: "A cooking range anti tip device was not installed at the time of inspection. Correction is recommended. This safety device is commonly supplied with the appliance from the manufacturer." What's so important about this little piece of metal? The range can easily overturn when the door is opened, and can potentially fall forward onto whomever might be in front of it. Children die all too often due to the lack of a missing anti tip device on ranges. In addition to being a terrible tragedy each time it happens, it is 100% preventable! How you can check your oven for an anti tip device: Look behind the oven along the floor. If the anti tip device is present, you should see a metal bracket along the wall near the floor. Not there? One of the rear legs of the stove slides into the tilt bracket, securing the stove to the floor. The brackets come as part of the stove’s assembly kit or you can purchase them at a hardware store. You only need a few basic tools to complete this project. Things You Will Need
1.Turn off power to the stove or unplug it. If the stove is hardwired, turn off power to it at the breaker box. You don’t need to disconnect the gas line, if applicable, but please be extra careful if your range is a gas model. It is possible to damage the gas line or connection when moving the range if you're not careful! 2. Pull (slide if possible) the stove away from the wall, taking care not to damage the floor. 3.Locate the template for the stove anti-tip bracket. It may be with the installation instructions or packed with the bracket. 4.Set the template on the floor so the back of it is flush with the wall and the side is flush with the cabinet next to the stove. If the cabinet’s counter top has an overhang on the side, move the template so the outside edge aligns with the counter top edge. Mark the location of the two screws required for the bracket onto the floor. 5. Drill two 1/8-inch pilot holes through the marked spots for the tilt bracket on a wood floor. Drill 3/16-inch pilot holes with a masonry bit for ceramic or stone floors. Insert plastic anchors into the holes. 6. Attach the tilt bracket to the floor with screws from the assembly kit. Use longer screws if your flooring is too thick for the screws to penetrate into the sub-floor. 7.Turn the back adjustable legs of the stove counterclockwise to extend them. Both legs should extend the same length. 8.Push (slide if possible) the stove into position, taking care not to scuff the floor. Do not pinch or bind the electrical cord or gas line. As you push the stove all the way back to the wall, you should feel and hear the adjustable leg on the side with the bracket slide into the anti-tip bracket. If you aren’t sure it’s aligned, pull out the bottom drawer of the stove. You should be able to see the bracket. If not, open the oven door and pull out the racks to see if the stove still wants to tip. If necessary, pull the stove away from the wall and push it back again at a slightly different angle. 9. Double check your work. Then, turn the power on again or plug the stove into its outlet. Tips
1 Comment
8/17/2022 04:21:57 pm
You make a great point about drilling two 1/8-inch holes. I need to get a gas insert installed. I'll have to consider hiring a contractor to help me out.
Reply
Your comment will be posted after it is approved.
Leave a Reply. |
AuthorCale Cameron Archives
May 2024
Categories |
Proudly powered by Weebly

 RSS Feed